So after some (but not much) code-clean-up… I wanted to implement the part where my networks (I now have 5 different basic network setups I play with…) can have nodes with not only different values for “resistance to attack” (e.g. variable Beta) but also variable detection capacity (e.g. how fast do I detect and clean up a node).
This is all very simplistic still (I should really think about moving to a SIRS model, but that’s less urgent). But it kind of works.
Different Network Setups
Now back in the day (quite some time ago, I suppose), one would separate an application in layers, say for a given physical datacenter, but the “DMZ” would be… Well, shared, often-times, across all front-end servers of several applications. Same would happen, probably, for backend subnets, and maybe for databases (this is just an example).
More recently, as one has the capacity to setup quickly new networks (e.g. because of Cloud, further segmentation, maybe micro-segmentation, SDNs, virtualization…), each Application can have its own area (dedicated networks), and each in turn can be more or less segmented. (I’m not considering containers and serverless just yet… That might stay for “future work”, in fact.)
And so I can have 1 application of 3 layers, or 3 applications in shared 3-layers setup (i.e. the one-DMZ thing), or 3 applications with varying level of segmentation for each, tied together at one backend firewall… Anyhow. (And where I say 3 applications, it would be almost trivial to do so for 10 or 100, but for observing the below, I’m keeping things simple.)
Policies: Variable Detection, Variable Protection
Now in spite of still being using a SIS simulator, it’s starting to resemble something… well, intelligible, I guess.
At this point, each node on my “corporate network(s)” can have more or less resistance to infection (varying Beta) and be assigned more or less detection/reaction effort/capacity (varying Mu).
The code is setup so that I can define such things in “Policies” that will reflect my Cybersecurity Efforts Distribution over the chosen network. Now this is still very simplistic, but it works somewhat as expected, and looks a bit like the following (just one example configuration):
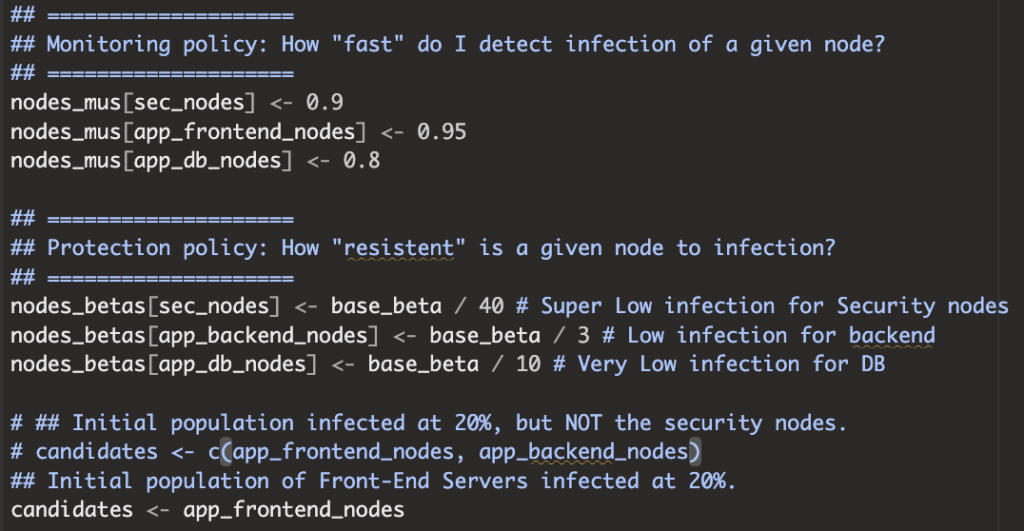
(Yes, there is a typo, I know, apologies)
All Mu and Beta values are between 0 and 1 (I use the SIS simulator approach with probabilities here). But one can tell, I could potentially distribute values arbitrarily across the nodes of my network. But that’s for later steps, for now I’ll run a few more tests on this setup…
Conclusions
I have been working with varying “policies” similar to the above to get a sense of the power of each of such configurations to protect my networks, although visually for now (but I sped up the visualization, 1 second per time step (as per the recently shared video) for 100 steps would have seen me get older too fast).
The point being, it “feels” like things make sense, more or less:
- More overall infection when using bigger subnets (and less segmentation).
- Less overall infection for more resistant nodes (lower Betas) and faster detection (higher Mus)
Although there is still much to be done, for sure.